.png)
Creating Your Own Business Website
Creating a clean, functional, and personalized website doesn't have to be overwhelming. Here we will work together to build a website that meets your needs and reflects your unique approach as a death doula.
In today's digital age, having a well-designed website is crucial for death doulas. A clean, functional, and personalized website establishes credibility, provides essential information, enhances accessibility, and reflects your unique approach. It also offers resources, facilitates client interaction, and boosts your marketing efforts. Let's work together to create a professional, personalized webpage that effectively supports your important work.
{What's the difference between a website and a webpage?}
A website is a collection of related web pages that are linked together and share a common domain name. It can contain multiple sections and pages, such as a homepage, about page, contact page, blog, and more. A website is essentially an entire online presence for a business or individual.
A webpage is a single, specific page within a website. It is a single document with a unique URL and is a part of the larger website. For example, the homepage of a website is a webpage, as are the about page and contact page.
In summary:
- A website is the entire collection of web pages under a single domain.
- A webpage is one specific page within that website.
~ We're going to create a website here, but it can be as simple as a one-page site.

So, we know it's important to have a website, but where do we start?!
Here's the simple plan:
Step 1 Identify the key information and features you want on your website and have this set aside for later.
Step 2 Begin brainstorming a clean and professional design that reflects your personality and values. This can include your branding, colors, themes, etc. Canva is a great resource to begin creating your branding. You can get your free Canva account here.
Step 3 Write clear and compassionate content that explains your services and shares your story. Your story is important and your visitors will want to be able to relate to you, but remember your services are why they are there. You can utilize AI like ChatGPT to help put your words into comprehensive content.
{WE ARE STARTING HERE} Step 4 Build the website using user-friendly tools that make it easy to update and maintain.
Step 5 Launch your website *hooray!* and continuously optimize it for better performance and visibility.
Steps 1-3 can be done prior to, or during the development of your website (step 4).
Your design, content, and services can be enhanced at anytime so getting your website built and launched will be our main focus on this page.
Let's build your website!
Step 1 Choose a user-friendly website builder. This is a tool that you will use to give you the online presence you want without having to do any coding.
There are many options to choose from, I personally use Wix so that is what I am using to demonstrate this sequence of steps. You can get your Wix account here (free to get started, then roughly $160-$300/year to use a custom domain URL for you site. Recommended).
Other user-friendly website builders include:
Squarespace (I find this one clunky and cumbersome but others may like it)
Webflow (good for slightly more advanced users)
GoDaddy (Newer, have not used it to build a website before, solely to purchase domain names)
If you choose to use one of these web builders follow the setup directions as prompted by the program.
Step 2 Begin creating your Wix account, no credit card required to sign up.
Step 3 Click on "For myself, my business, or a friend


{If you'd prefer a video walkthrough of these steps, watch this video}
Step 4 Choose what type of website you want to create. Death doula isn't an option so choose something that piques your interest, or related in a way that will populate templates that you think you might like.
NOTE: You cannot change your template later, you can change the content, but the formatting of page templates will be unchangeable. You DO NOT have to choose any template, you can click 'SKIP' in the top right corner for now.

Step 5 Name your website. This can be changed at anytime. It's recommended to use your company's name, or something similar. This is not where you will put in your domain URL. Just a basic name here.

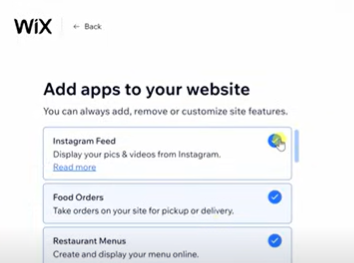
Step 6 Wix gives you the option to add existing apps to your page. You can add these at anytime so I'd suggest unchecking the blue circles before proceeding. Next, click on "Go to Dashboard".
Step 7 Your dashboard is like the control center for your entire website Don't let it overwhelm you at first glance, you won't use most of it unless you want to. This is mine after it's been launched. Below, step 8 will walk you through the remaining set up steps.

Step 8 You'll be asked to complete the remaining 3 of 4 set-up steps.
Step one you will see has been complete.
Step two you can connect your custom domain if you have purchased one from a domain host (video directions to purchase from GoDaddy can be found on the easy tech page). You do NOT have to use a custom domain.
Step three "Click on Design Site" to get started designing!
Step 4 get found on google (it's recommended you do this later).

Step 9 Next, you can choose if you want Wix to design a site for you, or you can choose to customize a designed template. I have only done the ladder in which you will be have more control, but ultimately will have to make more decisions. Choosing the option to let Wix design you a website is common for beginners.
Step 10 Review and add any additional info including your logo. Then click, next.
Step 11 Pick a theme you like that will be the overall feel of your site, of click skip and choose your oen designs later. For the purposes of these steps I chose one of the offered designs.
Step 12 Pick your favorite homepage design
Step 13 Add additional pages to your site if you'd like, or click skip as this can always be done later.
Step 14 Congratulations! Your site is up and running. Yes, your site is Live, but not to be confused with Published.
This just means that your site is up and can now be edited to your hearts desire! To add sections, or change content, click on "Go to Editor"


Step 15 This is where I will turn you over for a bit to our friend Kevin who will show you around the editor studio of your brand new site. Editing begins at the 5:35 minute mark. Take it away Kevin!
Step 16 Once you are happy with your site and are ready for the world to see it, you can click publish in the top right hand corner. This will go ahead and publish your site if you are using a Wix domain.
IMPORTANT: If you want to use a custom domain you will need to purchase a plan through Wix. Wix often runs a 50% off discount for annual subscriptions. It's wise to purchase your plan during this time. To set up and verify your custom domain follow the next steps below.
{Should I use a custom domain?}
It's HIGHLY recommended. It gives your business a much more professional look and feel as well as offers easy recognizability to clients and customers.
A custom domain example is {www.thedeardoula.com}, as opposed to a free Wix domain which may look something like this {www.wix.deardoula35964.com}. While it's a money saver to use a free one, it's not where we'd recommend pinching pennies in your business.
Step 17 If you are going to go ahead and connect your custom domain watch this 5 minute video below for easy to follow set up instructions. You will need your domain address that you have purchased from a domain host (ex GoDaddy). Log into both Wix and your domain host and follow the instructions. The first time you connect your domain it may take up to 48 hours to verify, but I've found it to be around 12-24 hours on average.
Step 18 If this seems overwhelming, just take a deep breath and think of it as though you are just connecting dots. If something goes wrong you should be directed to the issue.
Step 19 If you have chosen to purchase your domain from GoDaddy they have made the process very simple with a video step-by-step process right inside of Wix when you get to that point. It will even send a real-time test to ensure you are set up correctly.

Step 20 Once you have updated your nameservers (instructions above in video) your part will be complete and verification will take up to a couple of days. You will get an email from Wix when your published website is updated with your custom domain. You now have your very own website designed and built by you, and open for business!
If this is a new skill for you you should be very very proud of yourself!!! Well done!
Share this MAJOR milestone with us in our private
group! Our private group is also a great place to seek feedback about functionality of your website, including testing out any features. Feel free to drop the URL in the group along with this image and ask for feedback you desire.
